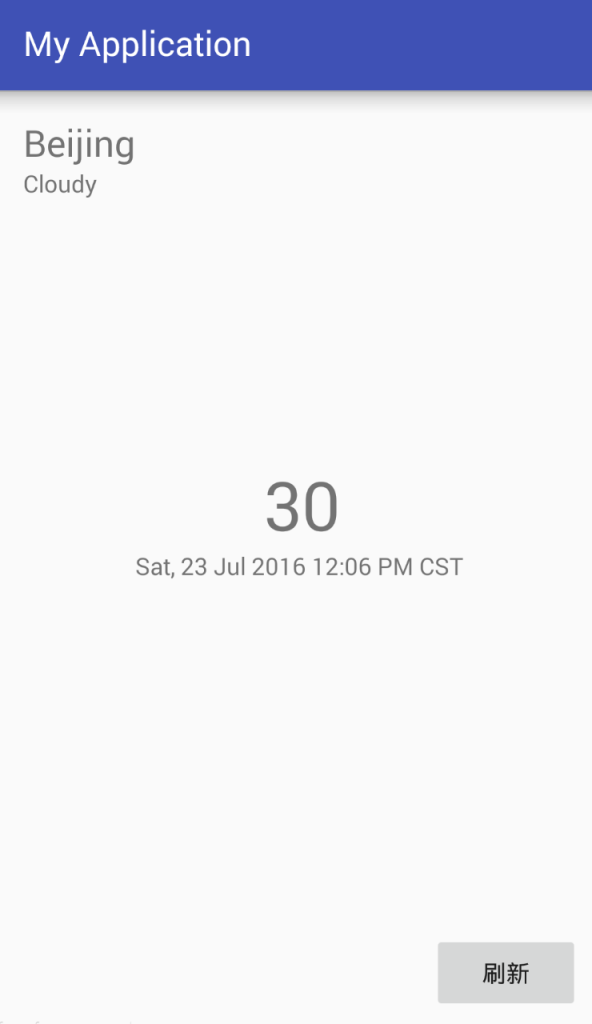
使用Retrofit(这是一个极其棒的网络请求库)来制作一个访问雅虎天气的demo。一步一步看看Retrofit是如何完成的。
yahoo 天气 json
首先我们来到这个链接(https://developer.yahoo.com/weather/),改写需要查询的地点为北京
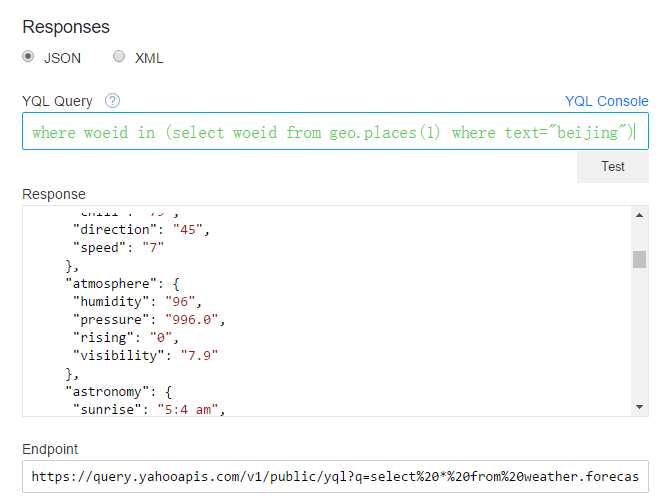
根据这张图,你可以看到yahoo给我返回的json和访问这个json的api链接。
还要小调整一下,默认你会看到返回的json中 “temperature”: “F” ,我们需要把他改成 “temperature”: “C”(摄氏温度),要在原来的YQL中加入( and u=’c’)
|
1 |
select * from weather.forecast where woeid in (select woeid from geo.places(1) where text="beijing") and u='c' |
安装Retrofit库
Retrofit是一个不错的网络请求库,而且用起来很省事。
打开https://github.com/square/retrofit ,你会看到它的详细信息,包括一个官网http://square.github.io/retrofit/。
使用Gradle方式安装它:
|
1 |
compile 'com.squareup.retrofit2:retrofit:2.1.0' |
把上面的代码附加到(build.gradle(Module.app)):
|
1 2 3 4 5 6 7 |
dependencies { compile fileTree(dir: 'libs', include: ['*.jar']) testCompile 'junit:junit:4.12' compile 'com.android.support:appcompat-v7:23.4.0' compile 'com.squareup.retrofit2:retrofit:2.1.0' } |
然后,点击 android studio 右上角的 sync now 进行安装
![]()
还没完,来到http://square.github.io/retrofit/。我们还需要使用到Gson,所以我们还要安装它才行,加入:
|
1 |
compile 'com.squareup.retrofit2:converter-gson:2.1.0' |
ok。
jsonschema2pojo
这个小工具是用来将JOSN转换成普通的java对象类。我们可以把我们之前生成的json放入到里面去,来创建我们需要的java对象。
打开这个工具的网址:http://www.jsonschema2pojo.org/
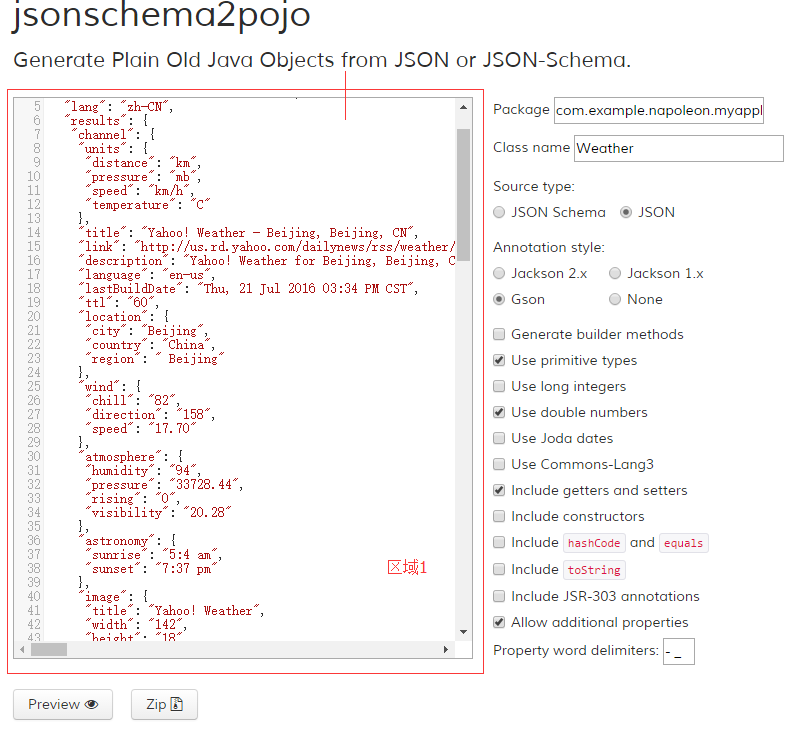
区域1:填写你之前【yahoo天气json】获取的json数据
Package:com.example.napoleon.myapplication.data 这是我们要放置的包名
Class name:Weather 我们需要创建的类名
点击:Preview可以预览要生成的Model类,Zip可以生成并下载这些类。
如果下载完毕,我们把相关的类,copy到我们的项目中去:
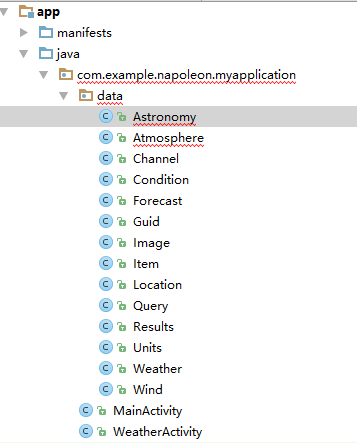
但是你copy这些文件后,他们有错误:
|
1 2 3 |
import javax.annotation.Generated; @Generated("org.jsonschema2pojo") |
怎么处理呢?
我们需要在build.gradle中添加
|
1 |
compile 'org.glassfish:javax.annotation:10.0-b28' |
如下位置
|
1 2 3 4 5 6 7 8 9 10 |
dependencies { compile fileTree(dir: 'libs', include: ['*.jar']) testCompile 'junit:junit:4.12' compile 'com.android.support:appcompat-v7:23.4.0' compile 'com.squareup.retrofit2:retrofit:2.1.0' compile 'com.squareup.retrofit2:converter-gson:2.1.0' compile 'org.glassfish:javax.annotation:10.0-b28' } |
安装后,就不会报错了。
创建WeatherAPI
来到项目中,创建remote包,并创建WeatherAPI接口,来让你的HTTP API转换成a Java interface,粘贴Retrofit官网前几步到你的文件中:
|
1 2 3 4 5 6 7 8 9 10 11 12 13 14 15 |
package com.example.napoleon.myapplication.remote; public interface WeatherAPI { @GET("users/{user}/repos") Call<List<Repo>> listRepos(@Path("user") String user); Retrofit retrofit = new Retrofit.Builder() .baseUrl("https://api.github.com/") .build(); GitHubService service = retrofit.create(GitHubService.class); } |
Retrofit可以将你的HTTP API转化为JAVA的接口的形式。例如:
而Retrofit类能够生成对应接口的实现。例如:
每一个由接口返回的Call对象都可以与远程web服务端进行同步或者异步的HTTP请求通信。例如:
Retrofit使用注解来描述HTTP请求:
1.URL参数的替换和query参数的支持
2.对象转化为请求体(如:JSON,protocol buffers等)
3.多重请求体和文件上传
注意:本站仍在为2.0扩展新的API
好了,我们要根据我们之前获取json的url,分析来改写这个类:
|
1 2 3 4 5 6 7 8 9 10 11 12 13 14 15 16 17 18 19 20 21 22 23 |
package com.example.napoleon.myapplication.remote; import com.example.napoleon.myapplication.data.Weather; import retrofit2.Call; import retrofit2.Retrofit; import retrofit2.http.GET; import retrofit2.http.Path; public interface WeatherAPI { String BASE_UEL="https://query.yahooapis.com/v1/public/"; @GET("yql?q=select%20*%20from%20weather.forecast%20where%20woeid%20in%20(select%20woeid%20from%20geo.places(1)%20where%20text%3D%22beijing%22)%20and%20u%3D'c'&format=json&env=store%3A%2F%2Fdatatables.org%2Falltableswithkeys") Call<Weather> getWeather(); Retrofit retrofit = new Retrofit.Builder() .baseUrl(BASE_UEL) .build(); WeatherAPI service = retrofit.create(WeatherAPI.class); } |
具体可查看http://square.github.io/retrofit/
还没完你知道这样是不行的,我们还要进一步优化:
|
1 2 3 4 5 6 7 8 9 10 11 12 13 14 15 16 17 18 19 20 21 22 23 24 25 26 27 28 29 30 31 32 33 34 35 36 |
package com.example.napoleon.myapplication.remote; import com.example.napoleon.myapplication.data.Weather; import retrofit2.Call; import retrofit2.Retrofit; import retrofit2.http.GET; public interface WeatherAPI { String BASE_UEL="https://query.yahooapis.com/v1/public/"; @GET("yql?q=select%20*%20from%20weather.forecast%20where%20woeid%20in%20(select%20woeid%20from%20geo.places(1)%20where%20text%3D%22beijing%22)%20and%20u%3D'c'&format=json&env=store%3A%2F%2Fdatatables.org%2Falltableswithkeys") Call<Weather> getWeather(); class Factory{ private static WeatherAPI service; public static WeatherAPI getIstance(){ if(service == null){ Retrofit retrofit = new Retrofit.Builder() .addConverterFactory(GsonConverterFactory.create()) .baseUrl(BASE_UEL) .build(); service = retrofit.create(WeatherAPI.class); return service; }else { return service; } } } } |
上面方便我们日后的使用,并且做了一个判断,当我们有WeatherAPI时,我们无需再生成对应的接口了。
构建视图
视图的布局和组件代码如下:
|
1 2 3 4 5 6 7 8 9 10 11 12 13 14 15 16 17 18 19 20 21 22 23 24 25 26 27 28 29 30 31 32 33 34 35 36 37 38 39 40 41 42 43 44 45 46 47 48 49 50 51 52 53 54 55 56 |
<?xml version="1.0" encoding="utf-8"?> <RelativeLayout xmlns:android="http://schemas.android.com/apk/res/android" xmlns:tools="http://schemas.android.com/tools" android:layout_width="match_parent" android:layout_height="match_parent" android:paddingBottom="@dimen/activity_vertical_margin" android:paddingLeft="@dimen/activity_horizontal_margin" android:paddingRight="@dimen/activity_horizontal_margin" android:paddingTop="@dimen/activity_vertical_margin" tools:context="com.example.napoleon.myapplication.MainActivity"> <TextView android:layout_width="wrap_content" android:layout_height="wrap_content" android:text="New Text" android:id="@+id/textView_city" android:textSize="65px" /> <TextView android:layout_width="wrap_content" android:layout_height="wrap_content" android:text="New Text" android:id="@+id/textView_conditions" android:layout_below="@+id/textView_city" android:layout_alignParentLeft="true" android:layout_alignParentStart="true" /> <TextView android:layout_width="wrap_content" android:layout_height="wrap_content" android:text="New Text" android:id="@+id/textView_temperature" android:textSize="120px" android:layout_above="@+id/textView_lastupdated" android:layout_centerHorizontal="true" /> <TextView android:layout_width="wrap_content" android:layout_height="wrap_content" android:text="New Text" android:id="@+id/textView_lastupdated" android:layout_centerVertical="true" android:layout_toRightOf="@+id/textView_city" android:layout_toEndOf="@+id/textView_city" /> <Button android:layout_width="wrap_content" android:layout_height="wrap_content" android:text="刷新" android:id="@+id/button_refresh" android:layout_alignParentBottom="true" android:layout_alignParentRight="true" android:layout_alignParentEnd="true" /> </RelativeLayout> |
下面是WeatherActivity的代码:
|
1 2 3 4 5 6 7 8 9 10 11 12 13 14 15 16 17 18 19 20 21 22 |
package com.example.napoleon.myapplication; import android.os.Bundle; import android.support.v7.app.AppCompatActivity; import android.widget.TextView; import butterknife.BindView; import butterknife.ButterKnife; public class WeatherActivity extends AppCompatActivity { @BindView(R.id.textView_city) TextView textView_city; @BindView(R.id.textView_conditions) TextView textView_conditions; @BindView(R.id.textView_temperature) TextView textView_temperature; @BindView(R.id.textView_lastupdated) TextView textView_lastupdated; @BindView(R.id.button_refresh) TextView button_refresh; @Override protected void onCreate(Bundle savedInstanceState) { super.onCreate(savedInstanceState); setContentView(R.layout.activity_weather); ButterKnife.bind(this); } } |
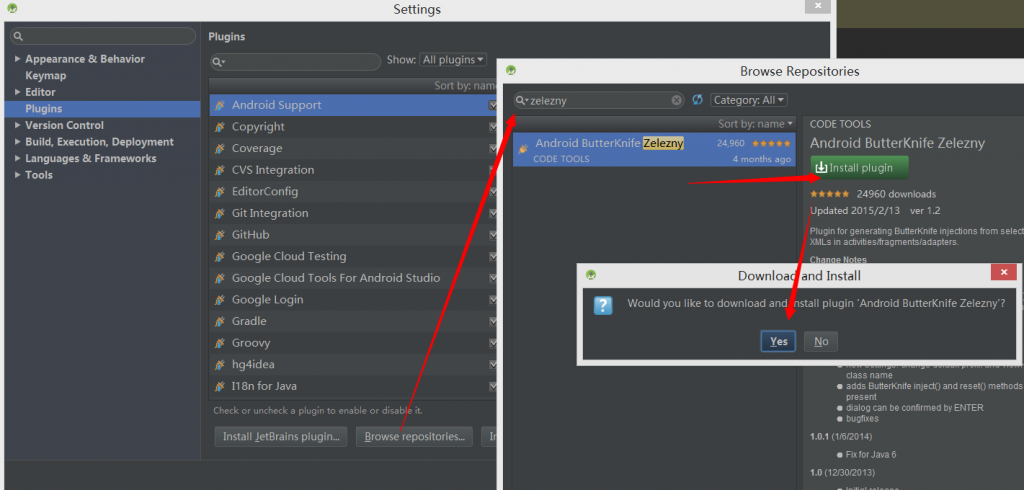
我们使用了一个ButterKnife插件,他的安装也很简单。
需要在(Project:MyApplication)的build.gradle中加入classpath ‘com.neenbedankt.gradle.plugins:android-apt:1.8’:
|
1 2 3 4 5 6 7 8 9 10 11 12 |
buildscript { repositories { jcenter() } dependencies { classpath 'com.android.tools.build:gradle:2.1.2' classpath 'com.neenbedankt.gradle.plugins:android-apt:1.8' // NOTE: Do not place your application dependencies here; they belong // in the individual module build.gradle files } } |
GRADLE:
|
1 2 3 4 5 |
apply plugin: 'com.android.application' apply plugin: 'com.neenbedankt.android-apt' .... compile 'com.jakewharton:butterknife:8.2.1' apt 'com.jakewharton:butterknife-compiler:8.2.1' |
再往Android Studio上安装该插件
绑定数据
程序需要点击刷新按钮,然后显示相应的天气信息,我们现在需要一个OnClick事件:
|
1 2 3 4 5 6 7 8 9 10 11 12 13 14 |
@OnClick(R.id.button_refresh) public void onClick_botton_refresh(){ WeatherAPI.Factory.getIstance().getWeather().enqueue(new Callback<Weather>() { @Override public void onResponse(Call<Weather> call, Response<Weather> response) { } @Override public void onFailure(Call<Weather> call, Throwable t) { } }); } |
然后将数据绑定到各个控件上:
|
1 2 3 4 5 6 7 8 9 10 11 12 13 14 15 16 17 18 19 20 21 22 23 24 25 |
@OnClick(R.id.button_refresh) public void onClick_botton_refresh(){ WeatherAPI.Factory.getIstance().getWeather().enqueue(new Callback<Weather>() { @Override public void onResponse(Call<Weather> call, Response<Weather> response) { Query query = response.body().getQuery(); textView_temperature.setText(query.getResults().getChannel().getItem().getCondition().getTemp()); textView_city.setText(query.getResults().getChannel().getLocation().getCity()); textView_lastupdated.setText(query.getResults().getChannel().getLastBuildDate()); textView_conditions.setText(query.getResults().getChannel().getItem().getCondition().getText()); } @Override public void onFailure(Call<Weather> call, Throwable t) { Log.e("Failed",t.getMessage()); } }); } @Override protected void onResume(){ super.onResume(); onClick_botton_refresh(); } |
还需要将这个类设置为启动页,来到AndroidManifest.xml文件,改写为WeatherActivity
|
1 2 3 4 5 6 7 |
<activity android:name=".WeatherActivity"> <intent-filter> <action android:name="android.intent.action.MAIN" /> <category android:name="android.intent.category.LAUNCHER" /> </intent-filter> </activity> |
当然别忘了加入访问网络的权限
|
1 |
<uses-permission android:name="android.permission.INTERNET"></uses-permission> |
如果你使用Genymotion一定要注意虚拟机也要联网哦。如果用的是wifi那么虚拟机也要连接wifi的。
看看效果:
