介绍数据表和字段,并描述他们之间的关系。创建entity并进行CRUD的创建,来感受一下symfony2的强大吧。
数据模型
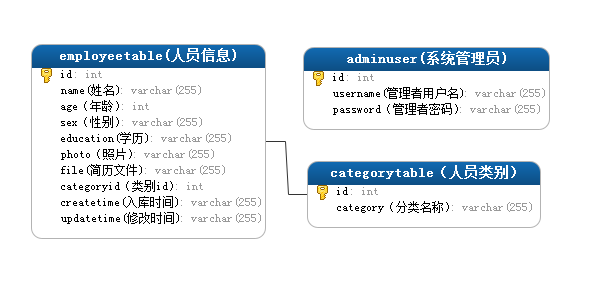
我们需要设计这样的几个表,来存储需要的数据。

把 categorytable和employeetable相互关联。
创建数据库
修改数据库的配置信息 app/config/parameters.yml
|
1 2 3 4 5 6 7 |
parameters: database_driver: pdo_mysql #这里我们使用mysql database_host: 127.0.0.1 database_port: null database_name:informationdb #数据库名称 database_user: root #数据库用户名 database_password: password #根据你的具体情况改写数据库密码 |
这样Doctrine就知道了你的数据库配置信息,这里用一行命令来创建数据库
|
1 |
php app/console doctrine:database:create |
好了数据库已经创建成功了,你可用数据工具查看一下。
创建数据库表
主要是如何告诉symfony2的Doctrine我们的数据结构是什么样的,要按照Doctrine的架构去创建相应的Entity对象,并将Entity对象的数据持久化到数据库中。
第一步 创建entity
让我们来到编码阶段这个很重要,需要多学习Doctrine是如何使用的。首先我们要创建三个Entity文件分别为Adminuser.php、Category.php、Employee.php 如何创建呢?
首先创建文件夹Entity (src\Nlc\InformationBundle\Entity)
然后输入创建entity的命令
|
1 |
php app/console doctrine:generate:entity |
回车后按照提示输入相关的Entity名
|
1 |
The Entity shortcut name:NlcInformationBundle:Adminuser |
按照提示输入字段名称和字段类型,最后会提示是否生成 Repository文件,也选择yes。记住使用annotation。
再创建Category的Entity
|
1 |
The Entity shortcut name:NlcInformationBundle:Category |
按照提示输入字段名称和字段类型,最后会提示是否生成 Repository文件,也选择yes。
再创建Employee的Entity
|
1 |
The Entity shortcut name:NlcInformationBundle:Employee |
按照提示输入字段名称和字段类型,不要创建外键字段,以后我们会手动添加ORM映射,最后会提示是否生成 Repository文件,也选择yes。
关于字段的类型symfony的Entity如何填写,请查看http://docs.doctrine-project.org/projects/doctrine-orm/en/latest/reference/basic-mapping.html#property-mapping
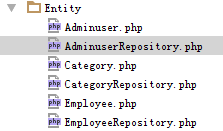
我们查看src\Nlc\InformationBundle\Entity下会发现生成了如下文件

第二步 修改相关entity文件
打开src\Nlc\InformationBundle\Entity\Category.php文件
首先要给Category指定数据库表名,在注释中修改如下 @ORM\Table(name=”categorytable”),如果不指定name如 @ORM\Table()那生成的数据表和entity类名相同
|
1 2 3 4 5 6 7 8 9 10 |
... /** * Category * * @ORM\Table(name="categorytable") * @ORM\Entity(repositoryClass="Nlc\InformationBundle\Entity\CategoryRepository") */ class Category { .... |
然后添加和employeetable表的关联
请阅读和了解Doctrine的orm的关系映射原理http://docs.doctrine-project.org/projects/doctrine-orm/en/latest/reference/association-mapping.html
在category.php文件中添加
|
1 2 3 4 5 6 7 8 9 10 11 12 13 14 15 16 17 18 |
/** * Category * * @ORM\Table(name="categorytable") * @ORM\Entity(repositoryClass="Nlc\InformationBundle\Entity\CategoryRepository") */ class Category { /** * @ORM\OneToMany(targetEntity="Employee",mappedBy="category") */ public $employees; public function __toString() { return $this->getCategory()?$this->getCategory() : '无类别数据'; } ... |
@ORM\OneToMany :一对多的意思;targetEntity:指定到关联Entity(Employee);mappedBy:映射到Employee的category对象上;理所当然我们也要在Employee的Entity类中添加category。
__toString()用于构建form表单下拉列表数据,也就是说下拉列表显示时调取数据时使用。
好现在修改Employee.php类了
|
1 2 3 4 5 6 7 8 9 10 11 12 13 14 15 16 17 18 19 20 21 22 23 24 25 26 27 28 29 30 31 32 33 |
... /** * Employee * * @ORM\Table(name="employeetable") * @ORM\Entity(repositoryClass="Nlc\InformationBundle\Entity\EmployeeRepository") */ class Employee { /** * @ORM\ManyToOne(targetEntity="Category",inversedBy="employees") * @ORM\JoinColumn(name="categoryid", referencedColumnName="id") */ public $category; /** * @ORM\PrePersist */ public function setCreatetimeValue() { if(!$this->getCreatetime()) { $this->createtime = new \DateTime(); } } /** * @ORM\PreUpdate */ public function setUpdatetimeValue() { $this->updatetime = new \DateTime(); } ... |
@ORM\ManyToOne:多对一关系,既然Category使用的时@ORM\OneToMany那么我们这个类自然要多对一关系并相互关联;targetEntity:关联到Category的Entity类;inversedBy:反推指定到Category下的employees对象。
@ORM\JoinColumn:在数据库中添加相应的字段;name:数据库表下字段的名称;referencedColumnName:关联主键ID;
同时添加
@ORM\Prepersist发生在每一个Entity持久化数据时执行;生成一条记录的创建时间;
@ORM\PreUpdate数据库更新实体数据之前调用的方法;当数据更新时生成修改时间
Doctrine的生命周期事件详解:http://docs.doctrine-project.org/projects/doctrine-orm/en/latest/reference/events.html#lifecycle-events
第三步 生成数据库表
请输入命令
|
1 |
php app/console doctrine:schema:update --force |
此命令创建和更新了数据库表
看看数据库把,表是不是已经建成了呢。
CRUD增删改查自动生成
来感受一下symfony的curd生成,可以让你省去很多时间和精力,为什么这么说呢!因为他只需要一个命令
|
1 |
php app/console doctrine:generate:crud --entity=NlcInformationBundle:Category --route-prefix=nlc_category --with-write --format=annotation |
可生成分类的增删改查。在controller文件夹下会生成一个CategoryController.php,打开它
|
1 2 3 4 5 6 7 |
/** * Category controller. * * @Route("/nlc_category") */ class CategoryController extends Controller { |
你会看到@Route设置路由路径为/nlc_category
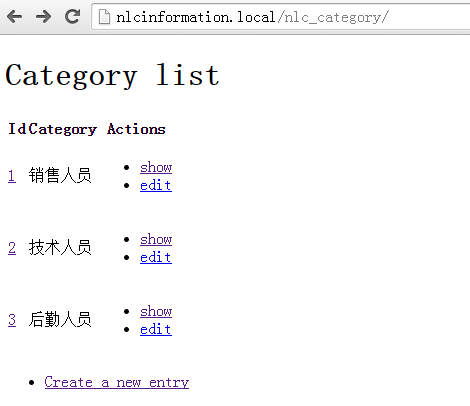
所以我们访问 http://nlcinformation.local/nlc_category 去添加几个分类(销售人员、技术人员、后勤人员)

下面生成员工信息增删改查
|
1 |
php app/console doctrine:generate:crud --entity=NlcInformationBundle:Employee --route-prefix=nlc_employee --with-write --format=annotation |
访问 http://nlcinformation.local/nlc_employee,ok!
下一章我们要讲解上传文件的操作

教程很详细,辛苦了!
晚辈有个问题,我按照之前的走过来都没问题,但是到这一步,访问/nlc_category的时候,页面就显示空白了,不知道是怎么回事