*这一系列文章来源于Fabien Potencier,基于Symfony1.4编写的Jobeet Tutirual。
假若你现在极其渴望打开你的文本编辑器来开始写PHP代码的话,那么今天的内容就能满足你的心愿了,我们会开始写一些代码了。我们将会定义Jobeet中需要使用到的数据模型,并使用ORM来和数据库进行交互,并且我们还会为应用创建第一个模块(module)。由于Symfony已经为我们做了很多工作,所以我们基本不用写太多的PHP代码就能拥有一个功能齐全的模块了。
关系模型
在第二天的用户stories中描述了Jobeet项目中的主要数据对象:职位(jobs),affiliates和分类(categories)。下面是它们之间的实体关系图:
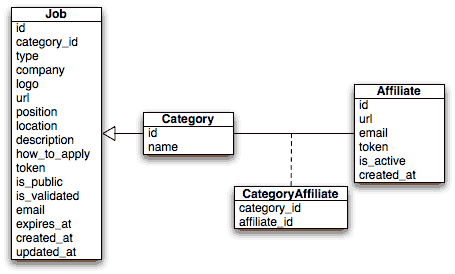
除了我们在stories中描述的列(columns)之外,我们还添加了created_at和updated_at列。当一个对象被保存到数据库中或者是被更新到数据库中时,created_at和updated_at这两个列将被自动更新。
数据库
为了让职位(jobs),Affiliates和分类(categories)能够被存放在数据库中,Symfony2.3.2使用了ORM工具—Doctrine。为了让应用能够连接到数据库,我们需要编辑app/config/parameters.yml文件(这里使用的是MySQL):
|
1 2 3 4 5 6 7 8 9 |
# app/config/parameters.yml parameters: database_driver: pdo_mysql database_host: localhost database_port: null database_name: jobeet database_user: root database_password: password # ... |
现在我们能让Doctrine连接到我们的数据库了。我们能通过在终端输入下面的命令来让Doctrine帮助我们生成数据库:
|
1 |
php app/console doctrine:database:create |
模式
为了让Doctrine能够“了解“我们的对象,我们需要创建“元数据”文件来描述对象在数据库中存放时对应的字段域。我们先在src/Ibw/JobeetBundle/Resources/config目录下创建一个doctrine目录。doctrine/目录下会包含三个文件:Category.orm.yml,Job.orm.yml和Affiliate.orm.yml。
|
1 2 3 4 5 6 7 8 9 10 11 12 13 14 15 16 17 18 19 20 21 |
# src/Ibw/JobeetBundle/Resources/config/doctrine/Category.orm.yml Ibw\JobeetBundle\Entity\Category: type: entity table: category id: id: type: integer generator: { strategy: AUTO } fields: name: type: string length: 255 unique: true oneToMany: jobs: targetEntity: Job mappedBy: category manyToMany: affiliates: targetEntity: Affiliate mappedBy: categories |
|
1 2 3 4 5 6 7 8 9 10 11 12 13 14 15 16 17 18 19 20 21 22 23 24 25 26 27 28 29 30 31 32 33 34 35 36 37 38 39 40 41 42 43 44 45 46 47 48 49 50 51 52 53 54 55 56 57 58 59 60 61 62 63 64 |
# src/Ibw/JobeetBundle/Resources/config/doctrine/Job.orm.yml Ibw\JobeetBundle\Entity\Job: type: entity table: job id: id: type: integer generator: { strategy: AUTO } fields: type: type: string length: 255 nullable: true company: type: string length: 255 logo: type: string length: 255 nullable: true url: type: string length: 255 nullable: true position: type: string length: 255 location: type: string length: 255 description: type: text how_to_apply: type: text token: type: string length: 255 unique: true is_public: type: boolean nullable: true is_activated: type: boolean nullable: true email: type: string length: 255 expires_at: type: datetime created_at: type: datetime updated_at: type: datetime nullable: true manyToOne: category: targetEntity: Category inversedBy: jobs joinColumn: name: category_id referencedColumnName: id lifecycleCallbacks: prePersist: [ setCreatedAtValue ] preUpdate: [ setUpdatedAtValue ] |
|
1 2 3 4 5 6 7 8 9 10 11 12 13 14 15 16 17 18 19 20 21 22 23 24 25 26 27 28 29 30 31 32 33 34 35 36 37 38 |
# src/Ibw/JobeetBundle/Resources/config/doctrine/Affiliate.orm.yml Ibw\JobeetBundle\Entity\Affiliate: type: entity table: affiliate id: id: type: integer generator: { strategy: AUTO } fields: url: type: string length: 255 email: type: string length: 255 unique: true token: type: string length: 255 is_active: type: boolean nullable: true created_at: type: datetime manyToMany: categories: targetEntity: Category inversedBy: affiliates joinTable: name: category_affiliate joinColumns: affiliate_id: referencedColumnName: id inverseJoinColumns: category_id: referencedColumnName: id lifecycleCallbacks: prePersist: [ setCreatedAtValue ] |
ORM
现在我们在终端输入下面的命令,Doctrine能够按照我们的定义来生成对应的类了:
|
1 |
php app/console doctrine:generate:entities IbwJobeetBundle |
现在我们可以在src/Ibw/JobeetBundle目录下看到一个Entity目录,在Entity目录中我们可以看到新生成的文件:Category.php,Job.php和Affiliate.php。打开Job.php文件,把created_at和updated_at的值设置如下:
|
1 2 3 4 5 6 7 8 9 10 11 12 13 14 15 16 17 18 19 20 |
// src/Ibw/JobeetBundle/Entity/Job.php // ... /** * @ORM\PrePersist */ public function setCreatedAtValue() { if(!$this->getCreatedAt()) { $this->created_at = new \DateTime(); } } /** * @ORM\PreUpdate */ public function setUpdatedAtValue() { $this->updated_at = new \DateTime(); } |
对Affiliate类中的created_at进行同样的修改:
|
1 2 3 4 5 6 7 8 9 10 11 12 |
// src/Ibw/JobeetBundle/Entity/Affiliate.php // ... /** * @ORM\PrePersist */ public function setCreatedAtValue() { $this->created_at = new \DateTime(); } // ... |
上面做的修改会让Doctrine在保存对象或者更新对象的时候更新created_at和updated_at的值。这些Doctrine行为被定义在Affiliate.orm.yml和Job.orm.yml文件的下面。接下来我们让Doctrine来帮助我们生成数据表,输入下面的命令:
|
1 |
php app/console doctrine:schema:update --force |
这个任务(task)只能在开发环境(development)中使用。如果需要在生产环境(production)中更新你的数据库的话,你可以查看Doctrine migrations。
现在数据表已经创建好了,但数据表中还没有任何的数据。对于一个Web应用来说,它们往往具有三类数据:初始数据(应用开始运行时所需要的数据,在Jobeet中我们需要初始化用的分类(categories)数据和管理员(admin)数据),测试数据(测试应用程序时需要用到的数据)和用户数据(用户在使用应用过程中创建的数据)
为了让我们的数据库中能有些初始数据,我们使用DoctrineFixturesBundle来帮我们生成数据。我们来按照下面的步骤来安装DoctrineFixturesBundle:
1、添加下面的代码到composer.json中的require区块中
|
1 2 3 4 5 6 7 8 9 |
// composer.json // ... "require": { // ... "doctrine/doctrine-fixtures-bundle": "dev-master", "doctrine/data-fixtures": "dev-master" }, // ... |
2、更新vender库
|
1 |
php composer.phar update |
3、在app/AppKernel.php中注册DoctrineFixturesBundle
|
1 2 3 4 5 6 7 8 9 10 11 12 |
// app/AppKernel.php // ... public function registerBundles() { $bundles = array( // ... new Doctrine\Bundle\FixturesBundle\DoctrineFixturesBundle() ); // ... } |
现在我们已经准备好DoctrineFixturesBundle了,我们在src/Ibw/JobeetBundle/DataFixtures/ORM/目录下创建一些新类来加载数据:
|
1 2 3 4 5 6 7 8 9 10 11 12 13 14 15 16 17 18 19 20 21 22 23 24 25 26 27 28 29 30 31 32 33 34 35 36 37 38 39 40 41 |
// src/Ibw/JobeetBundle/DataFixtures/ORM/LoadCategoryData.php namespace Ibw\JobeetBundle\DataFixtures\ORM; use Doctrine\Common\Persistence\ObjectManager; use Doctrine\Common\DataFixtures\AbstractFixture; use Doctrine\Common\DataFixtures\OrderedFixtureInterface; use Ibw\JobeetBundle\Entity\Category; class LoadCategoryData extends AbstractFixture implements OrderedFixtureInterface { public function load(ObjectManager $em) { $design = new Category(); $design->setName('Design'); $programming = new Category(); $programming->setName('Programming'); $manager = new Category(); $manager->setName('Manager'); $administrator = new Category(); $administrator->setName('Administrator'); $em->persist($design); $em->persist($programming); $em->persist($manager); $em->persist($administrator); $em->flush(); $this->addReference('category-design', $design); $this->addReference('category-programming', $programming); $this->addReference('category-manager', $manager); $this->addReference('category-administrator', $administrator); } public function getOrder() { return 1; // the order in which fixtures will be loaded } } |
|
1 2 3 4 5 6 7 8 9 10 11 12 13 14 15 16 17 18 19 20 21 22 23 24 25 26 27 28 29 30 31 32 33 34 35 36 37 38 39 40 41 42 43 44 45 46 47 48 49 50 51 52 53 |
// src/Ibw/JobeetBundle/DataFixtures/ORM/LoadJobData.php namespace Ibw\JobeetBundle\DataFixtures\ORM; use Doctrine\Common\Persistence\ObjectManager; use Doctrine\Common\DataFixtures\AbstractFixture; use Doctrine\Common\DataFixtures\OrderedFixtureInterface; use Ibw\JobeetBundle\Entity\Job; class LoadJobData extends AbstractFixture implements OrderedFixtureInterface { public function load(ObjectManager $em) { $job_sensio_labs = new Job(); $job_sensio_labs->setCategory($em->merge($this->getReference('category-programming'))); $job_sensio_labs->setType('full-time'); $job_sensio_labs->setCompany('Sensio Labs'); $job_sensio_labs->setLogo('sensio-labs.gif'); $job_sensio_labs->setUrl('http://www.sensiolabs.com/'); $job_sensio_labs->setPosition('Web Developer'); $job_sensio_labs->setLocation('Paris, France'); $job_sensio_labs->setDescription('You\'ve already developed websites with symfony and you want to work with Open-Source technologies. You have a minimum of 3 years experience in web development with PHP or Java and you wish to participate to development of Web 2.0 sites using the best frameworks available.'); $job_sensio_labs->setHowToApply('Send your resume to fabien.potencier [at] sensio.com'); $job_sensio_labs->setIsPublic(true); $job_sensio_labs->setIsActivated(true); $job_sensio_labs->setToken('job_sensio_labs'); $job_sensio_labs->setEmail('job@example.com'); $job_sensio_labs->setExpiresAt(new \DateTime('+30 days')); $job_extreme_sensio = new Job(); $job_extreme_sensio->setCategory($em->merge($this->getReference('category-design'))); $job_extreme_sensio->setType('part-time'); $job_extreme_sensio->setCompany('Extreme Sensio'); $job_extreme_sensio->setLogo('extreme-sensio.gif'); $job_extreme_sensio->setUrl('http://www.extreme-sensio.com/'); $job_extreme_sensio->setPosition('Web Designer'); $job_extreme_sensio->setLocation('Paris, France'); $job_extreme_sensio->setDescription('Lorem ipsum dolor sit amet, consectetur adipisicing elit, sed do eiusmod tempor incididunt ut labore et dolore magna aliqua. Ut enim ad minim veniam, quis nostrud exercitation ullamco laboris nisi ut aliquip ex ea commodo consequat. Duis aute irure dolor in reprehenderit in.'); $job_extreme_sensio->setHowToApply('Send your resume to fabien.potencier [at] sensio.com'); $job_extreme_sensio->setIsPublic(true); $job_extreme_sensio->setIsActivated(true); $job_extreme_sensio->setToken('job_extreme_sensio'); $job_extreme_sensio->setEmail('job@example.com'); $job_extreme_sensio->setExpiresAt(new \DateTime('+30 days')); $em->persist($job_sensio_labs); $em->persist($job_extreme_sensio); $em->flush(); } public function getOrder() { return 2; // the order in which fixtures will be loaded } } |
现在我们已经把Fixtures写好了,我们可以使用下面的命令来加载这些数据:
|
1 |
php app/console doctrine:fixtures:load |
现在我们可以去数据库看看,我们将会看到数据表中已经有数据了。
查看浏览器
运行下面的命令,它将会创建一个新的控制器(controller)src/Ibw/JobeetBundle/Controllers/JobController.php,这个控制器还带有CURD动作(Action)。
|
1 |
php app/console doctrine:generate:crud --entity=IbwJobeetBundle:Job --route-prefix=ibw_job --with-write --format=yml |
运行命令之后,选择默认的答案(answer)即可,这可能需要被要求做一些配置。
为了能在浏览器中访问到刚生成的控制器,我们需要导入(import)新生成的路由(routes)文件src/Ibw/JobeetBundle/Resources/config/routing/job.yml到主路由文件中:
|
1 2 3 4 5 6 |
# src/Ibw/JobeetBundle/Resources/config/routing.yml IbwJobeetBundle_job: resource: "@IbwJobeetBundle/Resources/config/routing/job.yml" prefix: /job # ... |
同时我们需要在Category类中添加__toString()方法,这样做是为了让Job表单能够下拉选择类别(category):
|
1 2 3 4 5 6 7 8 9 |
// src/Ibw/JobeetBundle/Entity/Category.php // ... public function __toString() { return $this->getName() ? $this->getName() : ""; } // ... |
清除缓存:
|
1 2 |
php app/console cache:clear --env=dev php app/console cache:clear --env=prod |
现在我们可以在浏览器中测试一下了:http://jobeet.local/job/,或者在开发环境中的http://jobeet.local/app_dev.php/job/。
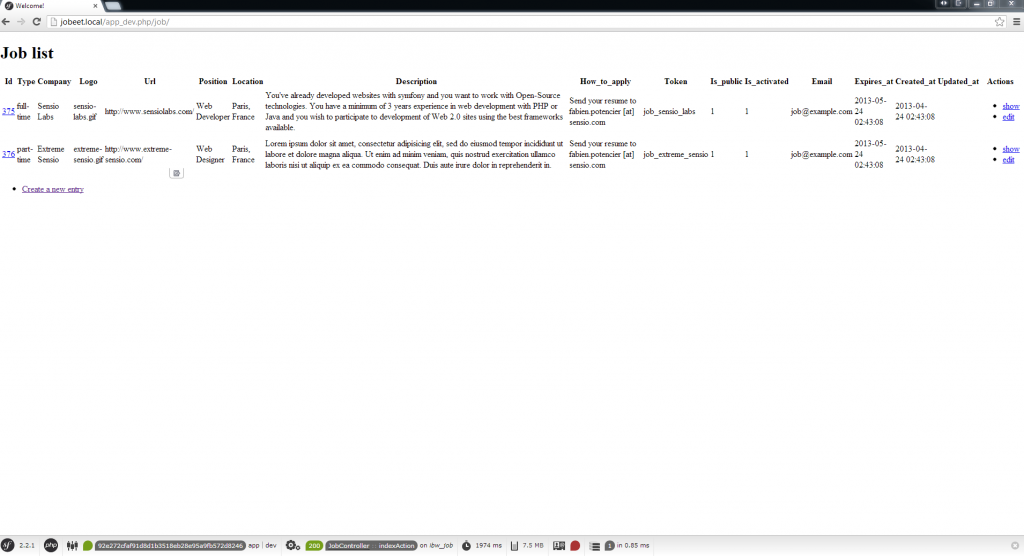
现在我们能够添加或者编辑职位信息(jobs)了。当然啦,你也可以试着让必填项留空或者输入无效的数据,测试一下系统会有什么反应。是的,你可以看到Symfony已经为我们创建了基本的验证规则,这些验证规则是按照我们的数据表来进行定义的。
今天我们就先讲这些啦。在今天的内容中,我们勉强地写了一些PHP代码,同时也有了一个职位(job)模型和job模块(module)。明天我们就来熟悉一下控制器(controller)和视图(view)吧,那么我们明天见。
原文链接:http://www.intelligentbee.com/blog/2013/08/09/symfony2-jobeet-day-3-the-data-model/
One comment